Why must my room always look worse before it looks better??
I forgot to take a picture of everything piled in the middle of my room before I started organizing! Because I moved some furniture around and added the new play kitchen (pictures coming soon) I had to empty all of the cabinets and shelving. The book shelves also got a good sanding, priming, and fresh coats of paint. They look so much better. I gave my office chair a face lift, and have been busy setting up the room! I can't wait to share pictures of how it turns out!
Wednesday, July 31, 2013
Diaper Owl
This is another example of a diaper owl that I created for another teacher friend of mine who will be a first time mother soon! I am so excited for her and her husband and miss her since she left the state.
 |
| This owl was created with 40 size 1 Pampers, a handmade yellow chevron big, 2 grey and yellow chevron minkie burp cloths, 1 ribbon lovie/taggie blanket, 1 oversized receiving blanket with white crocheted edging, 1 wash cloth, some ribbon, and 2 flowers. |
What A Hoot Baby Shower
Just wanted to share some pictures from our What A Hoot Baby Shower


 |
| Ribbon Wreath: ribbons tied around a wire hoop with personalized wooden frame |
 |
| Guests signed in by "leafing" a thumbprint on a pre-made 12 x 12 scrapbook page |
 |
| Guests stamped foot prints to guess what day the baby would arrive and signed their names |
 |
| Banner, paper owl lanterns, and basket to deposit socks for our sorting game |
 |
| Center pieces: twigs and small flowers with owls all in an antique Mason jar with scrapbook paper wrapping and Depression glass soda glasses holding ink pens and sundae dishes for sweet treats |
 |
| Seating for 18. The tables were set on a white linen with burlap runners. Party favors and Candy game were in each place. |
 |
| Baby Shower banner created with Heidi Grace Paper and Cricut. Banner was tied together with ribbons Displayed on mantel were custom made presents: 3 diaper owls and shadow box |
 |
| Paper owl Lanterns....Recognize these? They are from my classroom! Around the dinning room fixture a series of paper lanterns, twigs, and poms brightened above the tables. |
 |
| Buffet set up with appetizers and sweet treats |
 |
| Gluten Free Chocolate Cake and French Vanilla cupcakes made by Sweet Sinsations in Belleville Cupcake toppers: woodland creatures created with Cricut |

 |
| Amazingly cute Cheese Ball owl created by Tammy Kowalski |
 |
| Party Favors: paper bootie filled with nail polish and nail file. Pregnancy is Sweet game |
 |
| Build a Baby Game: guests were given babies I cut out using my EveryDay Paper Dolls Cricut Cartridge. They selected hair and accessories from a selection in a basket. Some babies had hair, some were bald. Guests were also given 2 photos (one of the mother to be and one of the father to be) and they cut out features for the baby and glued them onto the paper babies. It was a "hoot" |
 |
| Diaper Owl: 40 diapers, 1 oversized receiving blanket with hand crocheted edging, 2 burp cloths to match, 1 wash cloth, 1 bib, 1 pair of socks, and 2 flowers |
 |
| Diaper Owl: 40 diapers, 2 ribbon "love/taggie" blankets , 1 receiving blanket, 2 wash cloths, 1 bib, and 2 flowers |
 |
| Diaper Owl: 40 diapers, 2 burp cloths , 1 receiving blanket, 2 wash cloths, 1 bib, and 2 flowers |
 |

 |
| Woodland Creatures Cupcake Toppers created with my Cricut |
 |
| Our beautiful Mamma to Be |


 |
| Best Friends! |

 |
| It's all fun and games..... and then the owl loses it's head! And then we laughed and laughed! |
Activities for the Shower:
*Thumbprint Guest Book
*Guess the Baby's Arrival Date
*Pregnancy is Sweet matching game
*Build a Baby Activity
*Wishes and thoughts for baby and Momma-pieces were custom made to match the scrapbook pages using PhotoShop and were distributed to guest in a personalized zip bag to keep all of the pieces together. The best part was when everyone spontaneously started to read what they had written to our Momma to Be
*Scrapbook pages were made representing each guest and included the well wishes and sentimental things guests had written, the build a baby, a prediction of what/who the baby would look like, photos of the guest and our momma to be, a photo of Momma opening her gift from that guest and what she was given. The scrapbook also included the guest book page, the arrival prediction page, photos from the shower and of the games and guests.
*Sock matching game: each guest brought pairs of socks/shoes/mittens and had 10 seconds to make as many pairs as she could. It was a lot of fun!
*Lunch's Gluten Free Menu: Chicken in Basil Cream Sauce, Steamed Green Beans, Garlic Mashed Potatoes, Loaded Italian Green Salad, Mixed Fresh Fruit Salad
*Appetizers: Spinach Artichoke Dip, Owl Cheese Ball, a variety of gluten free crackers and flat breads, chocolates, chocolate covered strawberries, cream puffs, Sixlets, and M&Ms.
Friday, February 1, 2013
Funny Feet Friday
Here are some pictures from our "F" week special activity: Funny Feet Friday!
 |
| Here are the boys' Funny Feet |
 |
| Here are the girls' Funny Feet |
Tuesday, December 11, 2012
Retelling and Sequencing Strategies
Build-A-Bot Comprehension Strategy
"Ten Seconds to Win It Challenge"
Skills: sequencing and retelling
 |
| Used a blank polka dot border plaque from Teacher Created Resources to write the directions for the game |
 |
| Start with Pre-made printed die cuts. These are from Carson Dellosa |
 |
| On the back, divide the robots into puzzle pieces. On each piece write one of 7 questions/retelling ideas: 1) Name the characters in the story 2) Tell where and when the story takes place 3) What is the main problem in the story? 4) Name an event at the beginning of the story 5) Name an event at the end of the story 6) Name an event in the middle of the story 7) What happens in the end? How is the problem solved? |
 |
| Before I cut them apart, I color coded the back of each robot with a different colored marker just in case the pieces get mixed up. |
 |
| Then I carefully cut the puzzle pieces out. I am laminating them for durability. |
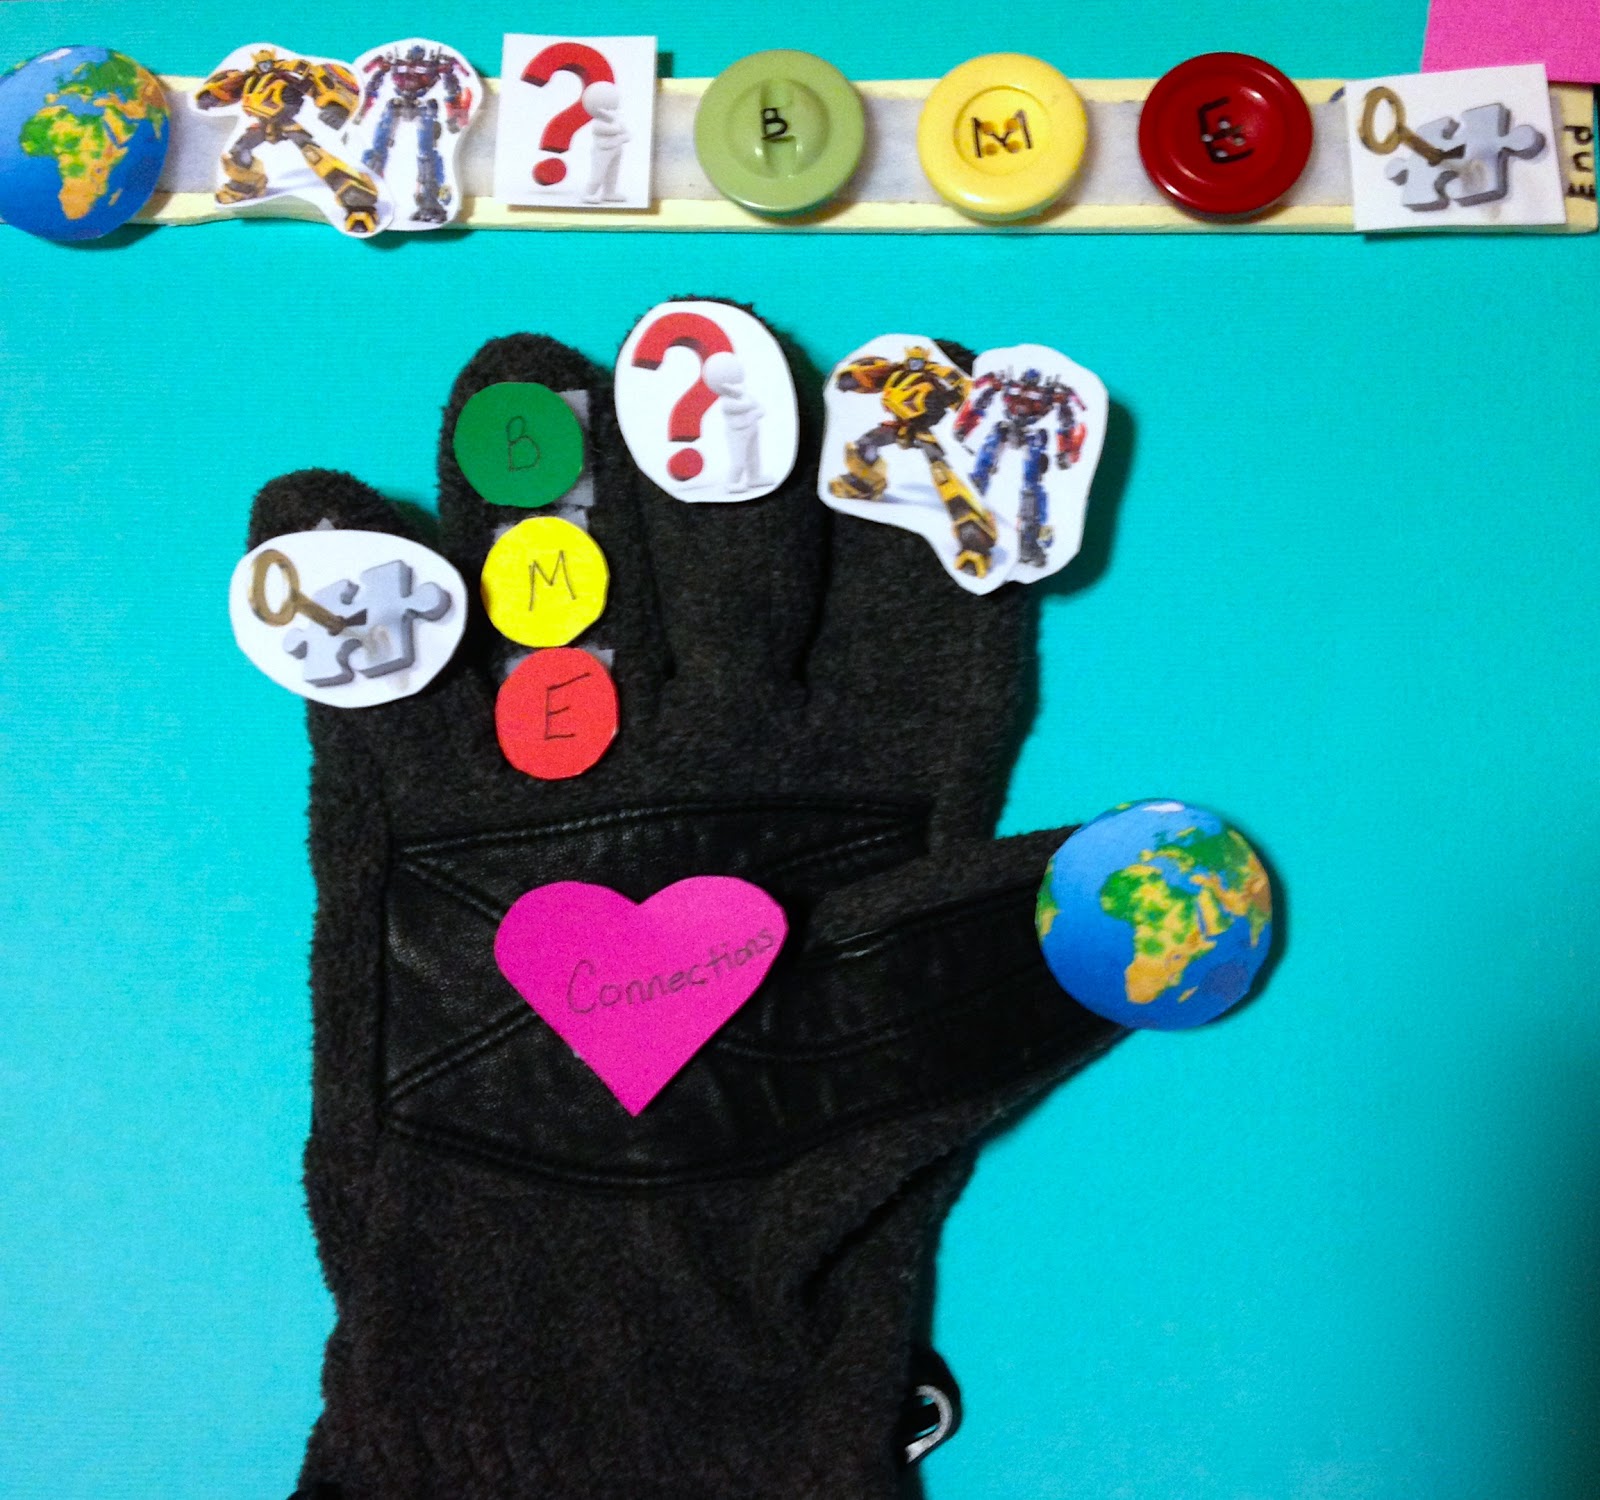 |
| There are two strategies here: 1) Retelling Stick: On a paint stick, I placed the fuzzy side of some Velcro along the length of the stick. Icons were then created to represent setting (time and place), characters (designed for a 3rd grade boy can't you tell!), problem, buttons for beginning, middle, and ending events, and solution. Icons can be removed and added as a story is being sequenced back together or used in many different ways. 2) Retelling Glove: This idea was one I found on Pinterest. The idea came from Ms. Young at Thirdgradethinkers8.blogspot.com. She described how she turned a stray glove into a retelling prop at her guided reading table. I happened to have a glove that has had a missing partner for a while. I was never sure why I kept it, but it sure came in "handy" for this activity. Like Ms. Young, I used Velcro to attach the icons. They are the same icons I used for my retelling stick. My glove has a few more components than hers. The student can put the glove on their hands and add the icons as they retell the story in sequence. I also added a connections heart to remind students to make personal connections. |
 |
| Next I made a bookmark by tracing a hand. This is the top side. I used scrapbook paper that I already had and plan to laminate the bookmark for durability |
 |
| This is the backside of the same bookmark. I colored the back with a marker first and wrote the components of the 5 finger retelling with connections on the hand with a fine tip Sharpie. |
Tuesday, December 4, 2012
Vocabulary and Sight Word Game
Gear up Vocabulary!
 Both of these games use the same basic format. They have a number and letter coordinate grid system. I use programmable cubes with cards that I made to fit inside. One has letters the other has numbers. Other supplies needed include cover up pieces and the game cards to fill in the grid.
Tips and suggestions for constructing the game:
To Play the Game:
 |
| This version is called "Hoot and Cover" I use it with varying sets of sight words for kindergarten. You can see it is modified to have only 25 words. In the early stages of kindergarten, I have the words on the chart more than once. On the dice, I programmed one letter and one number twice since the grid was reduced in size. To be able to cover a sight word, the student must correctly say the sight word. |
 |
| This version is called "Gear Up Vocabulary" and is being used with a third grade student I am tutoring. I used a robot theme on this version. Because this was also designed to be a center in a third grade classroom, I included directions (top right of the picture) and a word bank (top left of picture) which can be removed and used during the game. The robots contain the letters and numbers for the grid. This picture shows the game with the second set of cards as described below. This version also has two sets of cards so students can visit the center twice during the week. For this week, there were 9 vocabulary words. Set One: 2 sets of 9 cards with the vocabulary word on the front and the definition on the back. 2 sets of 9 cards that had the definition on the front and the vocabulary on the back. Set Two: 4 sets of 9 cards. The first 9 cards asked for a synonym of the vocabulary word. The second set asked for an antonym of the vocabulary word. The third set used a cloze procedure and students must fill in a vocabulary word within a blank in the sentence based on the context of the sentence provided. The final set asked students to identify the category of the part of speech the word fell into. |
Friday, November 30, 2012


Subscribe to:
Posts (Atom)