Tuesday, August 21, 2012

Kissing Hand Book Buddy Project

These are the projects that we completed with a little help from our 4th Grade book buddies for The Kissing Hand.  

Before we began the project, we helped the 4th graders become familiar with the story of Chester and his mama in The Kissing Hand by watching an online StoryTime by Barnes and Noble available at:  http://www.barnesandnoble.com/u/online-storytime-books-toys/379003588 in which Audrey Penn, the author reads the story in her own voice!

The fourth graders traced their kindergarten book buddy's hand and cut it out.  Then they read the kindergarten student the starter:  "I want to learn how...."  The fourth graders recorded the kindergarteners' dictations of what they want to learn how to do in kindergarten on the lines at the bottom of the page.  The handprints were glued to the center and students folded down their fingers to make "I love you."  A heart for Chester and the Kissing Hand was glued to the middle of the palm of each hand.

As you can see, each Chester is special and unique.  The kindergarten students were given the pieces for Chester in stages and were asked to follow the directions to color the different pieces.  These are far from perfect, but I think they are absolutely perfect!
Each Chester is made up of 9 hearts, 2 eye balls, and a tail.  Not all of the Chesters had all of the pieces by the time they were finished, but they are all very cute and special!  We look forward to many projects with our book buddies this year!

Kissing Hand Homework


This is an example of our homework packet that is sent home, and the book that we will create from the products of that homework when it is returned.
 

Here, our classroom Chester is sitting beside the homework packet that is sent home on the first day of school and the classroom book that we will put together when the homework is returned.  Students are sent home with a zipper bag filled with a note with the instructions for the assignment, 2 sheets of construction paper, and two hearts.  The note has a checklist of ideas for parents/guardians/or loved ones to use to ask their children about their first day of kindergarten.  The families are asked to trace their hands, cut them out, then take the heart that has been provided for them and give it a big kiss in front of their students, glue the heart down, and finally write a "heart felt" message to their child on the hand and heart.  When the hands are returned to school in the zipper bag, I take them and mount them on another sheet of construction paper that I have cut to fit inside standard plastic sheet protectors. 
 I have the sheet protectors bound together with 3 ribbons which makes the book customizable each year. The book is then shared with the class when the hand prints have all been returned. Students love hearing what their parents have written to them and hearing what other parents have told their children. I keep the class book in our library area all year so students can revisit the book as needed. I have used to book to help students who have had separation anxiety in past years. I created the cover of the book using my PrintShop program and the same clipart I found on the Internet that I used on the take-home booklet that the students created on the first day.  I absolutely love the messages that come back from home and it really helps me keep in perspective that each of these students is someone's baby!  :) 

At the end of the year, I take the book apart and I place the pages in each of the students' memory books along with the pictures I took of the families at open house and all the other artifacts and pictures I have taken throughout the year.

Kissing Hand on the First Day of Kindergarten

This is our First Day of Kindergarten Project.  After we have read The Kissing Hand and have gone on our scavenger hunt tour of the school, we work on these booklets throughout the first day.  This booklet is actually made up of 4- 8.5x11 papers that I ran through the copy machine so they were printed on 17x22 inch paper.   I then fold the copies into booklets. 

I was fortunate to have the help of the art teacher this year while making hand prints of the students.  This really sped up the process, and I really appreciated her help!  I have made the hand prints with both a stamp pad and tempera paint.  Overall, I would recommend the tempera paint-it made a really nice hand print and dried fairly quickly.  I used a wide paint brush to paint the palms of my students' hands.  The stamp pad also made a nice hand print, although I found the details to be fainter (which could have just been my stamp pad).  The tempera paint was washable and came completely off the students' hands.

This project has an underlying purpose for me.  I get an indication of how and if students are able to write their names, and I get a first hand look at their pre-writing skills by the types of drawings that they make of their families.  I can begin to make some observations of what stage of development they are in with their writing skills  by the types of drawings they make.  I also get a look at their coloring skills, how they hold their pencils and crayons, and I also get a picture of how well students are able to follow directions and work independently as I am working with other students.

This booklet is sent home with students on the very first day of school so students have something to help prompt them to talk to their families about what they did in school on the first day of Kindergarten.  I also send home homework for the families, which will be described in a different post.

A description of each page of the booklet is listed in the captions.


This the front cover of our booklet we create on the first day of school.  Students write their first names and I fill in the date on which they began Kindergarten.  This page was created using my PrintShop program and picture I found of the book on www.Amazon.com
This is actually the back page of the booklet.  I use this coloring sheet as a buffer for students to work on as they are waiting patiently for me as I am helping students create their hand prints on the inside section of the booklet.  This coloring sheet is available at:  http://www.wiseowlfactory.com/BookaDay/archives/3088
These are the inside two pages of the first day of school booklet.  On the left, the students dictate to the teacher how they felt on the first day of school, they write their names in the first box, then we used tempera paint to coat the students hands and pressed a hand print in the middle square (I've also used a large stamp pad for this activity), and finally they draw a picture of their families.  After the paint has dried, and hands have been washed, we take a paper heart that I have already cut out with the Cricut and we in dramatic fashion give it a kiss, and glue it in the center of the hand prints that we made. On the right page, there is a poem that has been around for a long time with the Chester theme and about what the hand prints on the left symbolize as we give this "gift" to our parents.  I created these pages using my good old PrintShop program and clip art I found on the Internet.  Hearts for the inside of the palms were cut with my Cricut Expression using the Plantin School Book cartridge with a setting of 1.5 inches.

The Kissing Hand introduction

The framework of the following activity is not my original idea, although many of the details, specifics to our school, and new materials are my creation.  Many Kindergarten teachers across the country have used this very same framework to begin their school years too.  I send my thanks out to the the many creative and vibrant teachers who shared what they have done in their classrooms and for the inspiration they have given me.

For the past two years, I have begun the new school year with one of my favorite books about starting school, The Kissing Hand by Audrey Penn.  In this book, a raccoon named Chester is a little anxious and reluctant to start school.  He thinks about how much he will miss his mama and miss being at home.  Chester's mama comes up with a brilliant plan to help Chester make it through his nights at school.  She takes Chester's hand and spreads his fingers into a fan.  Then, Chester's mom plants a kiss on the inside of his palm.  The book says, "Chester felt his mother's kiss rush from his hand up his arm, and into his heart."  She reminds him that whenever he fells lonely at school, all he has to do is press his hand to his cheek and fell his mother's warm kiss.    As Chester leaves for school, he returns the kissing hand to her to keep her from getting lonely while he is at school. Say it with me, "Awwwwwww."


At the very end of the book, Chester has left our Kindergarten class a note.  The note is one of many in a series of clues that will lead the Kindergarten class on a "Gingerbread Man" type hunt around the school that serves the hidden purpose of taking the Kindergarten on a tour of the school and meeting some of the important people who will be part of their lives.  Chester visits the nurse, the cafeteria, the courtyard, the computer lab, the art room, the music room, the library, the dome (P.E.), and the office with the secretaries, principal, and dean of students.  The secretary is always my help and places foot prints from the office (our last stop) back to our classroom where the students find the Chester you see below and a basket of treats.  The years I don't have peanut allergies in my room I have her leave a Hershey kiss for each of the students on their desks, but when I have students with allergies, I have Chester leave Skittles for a "bright and colorful year." 

Students always wonder if Chester is really real or if I am pulling their legs!  They want to see the real Chester when we get back to the classroom, and are usually mildly disappointed when all we find is the paper version.  I tell them that Chester left us a picture that we can put on the tree on our "Rug Time" carpet area so we can always think of him when we see him each day.  I tell them that the real Chester could not stay at school because he has to get to bed so he can go to Kindergarten that night.  I tell them going to bed on time is important for being ready to learn at school each day.  Chester and his "schedule" is also a good connection to learning in upcoming weeks when we discuss nocturnal animals.

  • I purchased the books from www.Amazon.com
  • The clues and papers with Chester's foot prints were created using Microsoft Word and some free raccoon clip art I found on the Internet
  • The paper version of Chester was created using my Cricut Expression Machine with the Create a Critter cartridge and some chalk for the coloring.


The Kissing Hand book , A Pocket Full of Kisses book, our classroom Chester, and the clues he left for us to follow around the school.
Here's the note Chester Left inside our Kissing Hand Book.  It was the first clue on our school tour on the first day of school.

Friday, August 3, 2012

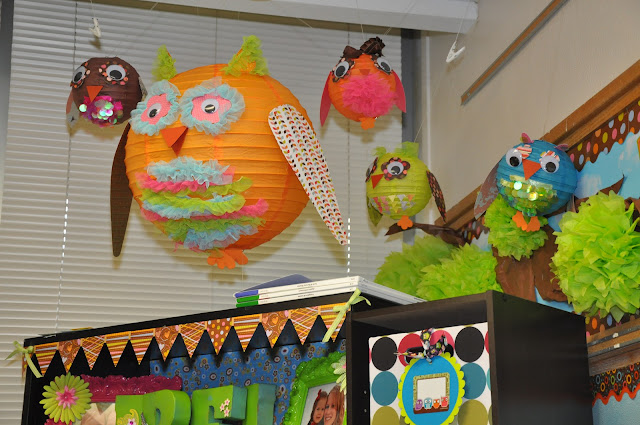
Paper Lantern Owls


This set of pictures is of the paper lantern owls I made this summer based off of some I saw on Pinterest and at the Teacher's Lounge in South County. The focus quality isn't that great. I'll take some better pictures with my D90 later.

Their main purpose is to hold the shape and color signs I use to call my table groups. I don't think the shapes are visible in any of the pictures.

I ordered the lanterns from Luna Bazaar. My intention was to make them with both the small globes and the long ones together. My original plan included a round head and long body piece. I should have ordered the small globe a size or two bigger. When I put them together, my owls looked like they had shrunken heads! So it was on to plan B. I made the small globes into little owls and attached the face pieces to the front of the long globe.

To make the details on my owls, I used various shapes that I cut out with my Cricut. I mainly used glue dots to attach the scrap book paper to the lanterns. I also bought several trims and ribbons to decorate the smaller owls and the large one over my desk. The owls are complete with wings, chest feathers, a beak, layered eyes with wiggly eyes on top, ears, tail feathers, and foam feet.

The tree the owls are landing on was made from crumpled brown bulletin board paper and the leaves are made from tissue paper Pom poms I purchased at Party City. They came in a pack of three. I cut them different sizes and thicknesses to give the leaves some variance in look.

The owls are hung from the ceiling with a combination of clear stretchy cord and ceiling clips.  The colored shapes were also cut with my Cricut.  I hung them by attaching ribbons on the inside of the owl to the shape I had cut and tied it all together.  The ribbon was slippery and to keep everything in place I use some of those mini "binder" clips with wings to hold the ribbon in place.


These owls have tulle, ribbon, and sequin details.